
Need to make a fabulous cake? Well, good thing this Alpha dedicated an entire year long project on cake decorating! So, I'll show you the basics and offer as many tips as I can. So basically, you need to start off with your cake - get it so it looks like this (or tiered if you like):

After you have your cake ready, time to lather on the icing or frosting! When you're done applying all the icing/frosting, you want the surface to be as smooth as possible. Now how do you do this? Okay, have a cup of pretty hot water and then take a cake knife. Dip it in the water, wipe with a paper towel and then glide over the cake. Tada - smooth surface!

Here are some easy techniques!
Shells
 1. Put the bag at a 45 degree angle - standing up and doing this would be easier
2. Initially squeeze the bag and then un-squeeze and relax pressure.
3. Lower the tip until it touches the surface
4. Relax the pressure and pull the tip away without lifting it off the surface to pull the shell to a point.
5. To make a shell border, start the end of your next shell so that the fanned end cover the tail of the preceding shell to form a chain.
 C-Motion
1. 45 Degrees, hold the tip slightly above the surface and then squeeze out the icing with even pressure, curve the tip down and around to the right as if writing a "c".
2. Repeat to complete the border, using a steady, even pressure. And then to end, stop pressure, pull the tip away.
 E-Motion
1. Once again, 45 degrees, and it's similar to the c-motion actually!
2. So squeeze out icing with even pressure, moving the tip up to there right and around as if writing the letter "e"
3. Repeat to complete the border, using a steady, even pressure. To end, stop pressure, pull tip away.
4. You can vary the look of the e-motion border by making tight e's or stretched e's.
Stars and Star Drop Flowers
Star - Instead of the regular 45 degrees, now its straight up 90 degrees. The important factor in this technique is to hole the bag above the surface. And then from there squeeze the bag to form the star. Stop the pressure and pull tip straight up and away. Increase or decrease pressure to change star tip size. Stars will be neatly formed only if you stop squeezing before you pull tip away.
Star Drop Flower - Similar to the star (90 degrees, blah blah blah), the difference between the two techniques is that this time the tip should be touching the surface. Now squeeze, letting icing build up to make the flower. Stop squeezing and then lift the tip away.
 Ruffles **You need a special tip**
1. Bag positioned at 45 degrees, with the wide end lightly touching the surface and narrow end down and away, squeeze steadily.
2. Move wrist up to pull up icing. Move wrist down to complete one curl of the ruffle.
3. Repeat up and down motion.
4. Raise and lower the narrow end as you move around the cake. Repeat this motion for the entire ruffle.
Vines **You need a special tip**
 1. Hold decorating bag at a 45 degree angle, and use thin consistency icing
2. Touch your tip lightly to the surface as you start to squeeze the bag, move tip gently up and down to form "hills and valleys"
3. To end the line, stop squeezing and pull the tip along the surface.
4. Then try pipping several vines together as if in a loose bouquet.
5. Add secondary curved stems for a natural look. Place tip into main vine, apply light pressure and gently pull out secondary vines. Stop pressure as you pull to a point.
 Swirl Drop Flower
1. Hold the bag 90 degrees, the tip should be lightly touching the surface.
2. As you squeeze out the icing, slowly turn your hand to 12:00. Stop squeezing and lift tip away.
The left image is a cake that I made, the flowers are a combination of swirl drop and star drop flowers .


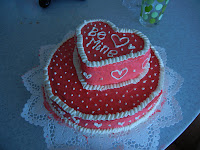
For this all you need is a steady hand and imagination! Good Luck! The left is little hearts and dots that I did on the sides of a cake. The right is a my version of a basket weave using two different colors and then script writing at the top.

So, I hope this was helpful! Happy Decorating and if you need any more help or any more techniques visit the Wilton Website - that's where I learned everything! (With a little help from MAMA ALPHA too)
Good Luck!
Love,
ALPHA

After you have your cake ready, time to lather on the icing or frosting! When you're done applying all the icing/frosting, you want the surface to be as smooth as possible. Now how do you do this? Okay, have a cup of pretty hot water and then take a cake knife. Dip it in the water, wipe with a paper towel and then glide over the cake. Tada - smooth surface!

Here are some easy techniques!
Shells
 1. Put the bag at a 45 degree angle - standing up and doing this would be easier
2. Initially squeeze the bag and then un-squeeze and relax pressure.
3. Lower the tip until it touches the surface
4. Relax the pressure and pull the tip away without lifting it off the surface to pull the shell to a point.
5. To make a shell border, start the end of your next shell so that the fanned end cover the tail of the preceding shell to form a chain.
 C-Motion
1. 45 Degrees, hold the tip slightly above the surface and then squeeze out the icing with even pressure, curve the tip down and around to the right as if writing a "c".
2. Repeat to complete the border, using a steady, even pressure. And then to end, stop pressure, pull the tip away.
 E-Motion
1. Once again, 45 degrees, and it's similar to the c-motion actually!
2. So squeeze out icing with even pressure, moving the tip up to there right and around as if writing the letter "e"
3. Repeat to complete the border, using a steady, even pressure. To end, stop pressure, pull tip away.
4. You can vary the look of the e-motion border by making tight e's or stretched e's.
Stars and Star Drop Flowers
Star - Instead of the regular 45 degrees, now its straight up 90 degrees. The important factor in this technique is to hole the bag above the surface. And then from there squeeze the bag to form the star. Stop the pressure and pull tip straight up and away. Increase or decrease pressure to change star tip size. Stars will be neatly formed only if you stop squeezing before you pull tip away.
 |
| Star on the Left, Star Drop Flower on the Right |

1. Bag positioned at 45 degrees, with the wide end lightly touching the surface and narrow end down and away, squeeze steadily.
2. Move wrist up to pull up icing. Move wrist down to complete one curl of the ruffle.
3. Repeat up and down motion.
4. Raise and lower the narrow end as you move around the cake. Repeat this motion for the entire ruffle.
Vines **You need a special tip**
 1. Hold decorating bag at a 45 degree angle, and use thin consistency icing
2. Touch your tip lightly to the surface as you start to squeeze the bag, move tip gently up and down to form "hills and valleys"
3. To end the line, stop squeezing and pull the tip along the surface.
4. Then try pipping several vines together as if in a loose bouquet.
5. Add secondary curved stems for a natural look. Place tip into main vine, apply light pressure and gently pull out secondary vines. Stop pressure as you pull to a point.
 Swirl Drop Flower
1. Hold the bag 90 degrees, the tip should be lightly touching the surface.
2. As you squeeze out the icing, slowly turn your hand to 12:00. Stop squeezing and lift tip away.
The left image is a cake that I made, the flowers are a combination of swirl drop and star drop flowers .
Script Writing and Free Style


For this all you need is a steady hand and imagination! Good Luck! The left is little hearts and dots that I did on the sides of a cake. The right is a my version of a basket weave using two different colors and then script writing at the top.


So, I hope this was helpful! Happy Decorating and if you need any more help or any more techniques visit the Wilton Website - that's where I learned everything! (With a little help from MAMA ALPHA too)
Good Luck!
Love,
ALPHA
No comments:
Post a Comment